

Many with Shopify stores focus on sales and overlook the fees that come with each transaction. However, these fees which range from subscription fees to payment processing fees can significant impact your profit margins. Being able to track them in your accounting software, ensures that your financials reflects true income. This clarity will help you with tax preparation, better manage, cash flow, and also make better informed decisions for your business.
In this blog, I’m going to explain how to record Shopify fees in QuickBooks to better reflect your true income.
Common Mistakes Businesses Make
A common mistake many business owners make is recording only net deposits from Shopify sales. By doing this, you completely ignore the fees deducted to arrive at net deposit. In other cases, business owners may clump up the fees into a single category with other fees. This makes it difficult to analyze the fees associated with Shopify alone. This issues can cause confusion in financial reports, and make it difficult to analyze where the expenses associated with running Shopify business come from.
To fix this issues, it is important to understand what is included in Shopify fees. As well as how to better track them within your accounting software.
Understanding Shopify Fees
Shopify has a few types of fees for its users. These fees range from payment fees to subscription fees associated with using your platform. We will explain each fee.
Type of Shopify fees
The subscription fee is the most predictable type of fee and it’s a fixed fee based on the plan used for your Shopify store. In addition, you will pay transaction fees on each sale if you don’t use Shopify Payments. Shopify also charges credit card processing fees based on your plan and your customer’s payment method. The payment processing fees are typically a percentage of the sales plus a flat rate.
Other Shopify fees include app fees. These fees come from using apps within Shopify. Third-party platforms typically host these apps, so they charge any associated fees directly to the credit card you use to pay for them, rather than including them in Shopify reports.
If not properly track, these fees can add up quickly and gravy impact your profit margins.
Now you might be wondering where all these fees show up on your Shopify store.
How Fees Appear in Shopify Reports
Shopify records, all its fees, except for a subscription fees, in its payout financial reports. The payout financial report shows exactly how much Shopify deposited into your bank account after deducting these fees. It also shows your net sales before the fees and the final amount after subtracting them. The net sales in this report typically includes gross sales, less of refunds, plus shipping income, minus discounts.
As you have already determined, the structure of these fees can be confusing without a report to break it down. Before entering net deposit (payouts), it is important to obtain the payouts reports to determine how much fees need to be recorded in your accounting software. Rather than guessing from the net deposit.
If you’re doing bookkeeping manually tracking shop fees can become difficult. However a software like Quickbooks can make the process more efficient.
Overview of Quickbooks for eCommerce
Quickbooks is a go to software for many Shopify owners to track sales and fees associated with their Shopify business. Its main feature as an accounting software is to centralized data and track income, expenses and profits in one place. This beats relying on spreadsheets or guesswork. QuickBooks provides structured accounting that aligns with standard financial practices. This makes it easier for you to organize anything associated with your Shopify business. It also helps you understand how Shopify fees can impact your bottom line.
Key Features That Help Track Shopify Feed
Shopify offers many features, but these are the ones that will help you better track shopify fees.
- Fully customizable expense accounts. These help separate transaction fees, subscription, cost, and app charges associated with using your Shopify platform.
- Shopify integration. This allows you to connect your Shopify store to QuickBooks directly in order to import fees into your QuickBooks platform. This also create a meaningful way to automate the recording of Shopify fees, directly into QuickBooks.
- Financial reports. Reporting tools like profit and loss statements allow you to see how each Shopify fee category affects your profit.
Overall, QuickBooks have everything I need to win sure the Shopify fees are being tracked efficiently and accurately
Setting up Chart of accounts for Shopify Fees
In order to track Shopify fees, so you need to set up your chart of accounts in QuickBooks.
Creating expense accounts for shopify fees
Some businesses simply use the bank charge account to tractors however, this may mix Shopify fees with other charges. It is best to create a separate account dedicated to Shopify fees alone in order to track them manually. This makes it easier to truly understand what is being charged to operate your Shopify business. It was a insures. Your financial reports are accurate and useful when analyzing the expenses or preparing for taxes.
To create a Shopify fees account in QuickBooks simply had to go to the chart of accounts. Then click add and then add a new expense called Shopify fees. Of course you can name this anything to identify Shopify related fees. The main message here is that only fees related to Shopify will be categorized into this accounts and nothing else.
Organizing accounts for clear reporting
As mentioned earlier, Shopify does have a few different fees. And so for some, it may be beneficial to separate the accounts in QuickBooks to accommodate each fee. For example, a person may choose to separate subscription fees from payments fees.
They may also choose to clump up fees associated with apps used in Shopify with the Shopify subscription and separately categorize the payment fees. Whichever way you choose to do this, QuickBooks does accommodate this with the use of parent categories. For example, you may have a parent category called e-commerce fees, and subcategories, such as Shopify fees, Shopify processing fees, or Shopify app fees under this. This will create three categories under one main categories to better understand the breakdown of the parent category. How detailed you want each category depends on how such detail affects your decision making.
There really is no right or wrong answer here. However , being able to organize your chart of accounts allows you to clearly read your financial reports.
Where to Find Shopify Fees Reports
There are 2 main types of fees you will encounter with shopify – subscription fees, and payment fees. Each is located at a different place on the Shopify platform.
Shopify Subscription Fees

Shopify subscription fees are the monthly fees Shopify charges for using their platform. Providers typically send invoices for these fees to your email each month. You can record these fees as part of your total Shopify fees, or you can categorize them as other subscription fees within your business in QuickBooks.
Another place to find your subscription invoices within the Shopify platform is by logging into Shopify > click settings > click Billing. Here you see a list of all the invoices for each billing cycle. You can download these invoices and use them as source documents when you record your Shopify subscription fees in QuickBooks.
Payment Process Fees
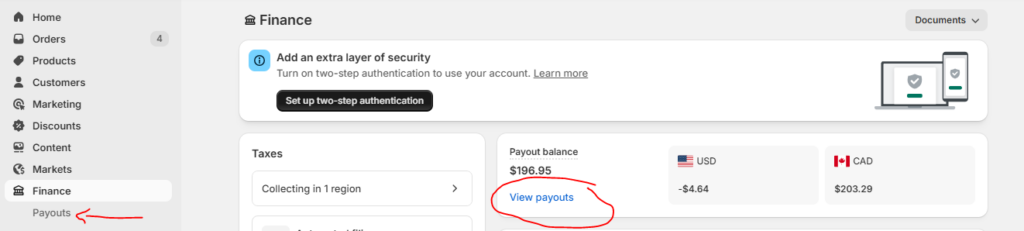
Payment fees are the fees that are associated with making a sale within Shopify. The amount for these fees can be found in the payout details report.
The report will show the amount collected using Shopify payments, all fees subtracted and amount left over after subtracting fees. This is the amount that’s deposited into Shopify sales.
You can find the Shopify payout report by logging into shopify > click finance > click payouts
Entering Shopify Fees into Quickbooks
Once categories are made to track Shopify fees, you can enter your Shopify fees into QuickBooks to track them. There are two main ways to do. One is through apps, and another is by using manual entries. We will explain both of these methods.
Using Apps
If you’re new to bookkeeping apps are by far the simplest and most efficient way to track your Shopify fees. Apps utilize Shopify’s API in order to connect the Shopify store into QuickBooks. Shopify has a direct integration with QuickBooks. You can utilize it by going into the QuickBooks app store, downloading it and connecting your Shopify store to QuickBooks. Others may prefer the use of third-party apps, to connect to Shopify store to Quickbooks.
No matter which method you choose to connect your Shopify store to QuickBooks, the system records Shopify fees in the same way. You need to connect these apps so they can pull the appropriate transactions from Shopify into QuickBooks. Once connected, QuickBooks creates entries based on the categories you assign to classify those transactions—this process is called mapping.
Even though most of the entries are done automatically, you can still make mistakes with the map. If you aren’t sure of how to map your Shopify it’s best to consult with a bookkeeping professional.
Using Manual Entry
You can also enter Shopify fees into QuickBooks, simply by manually entering these fees into the accounting software. This does require some level of bookkeeping experience in order to do this in confidence and successfully.
Unlike apps, entering Shopify fees manually can be time consuming as your sales volume increases. However, some optimize this by choosing to answer them once per month, rather than entering them on a daily basis.
Manually entering Shopify fees into QuickBooks involves 3 things.
- Downloading a report from Shopify
- Analyzing the numbers within the report
- Accurately entering the fees associated with operating a Shopify store into QuickBooks.
Pros vs Cons of Entering Shopify fees manually vs automatically
They are some pros and cons of entry in Shopify fees manually versus automatically.
First, automation does save time and reduces human error as you deal with large numbers of transactions. Also, there’s consistency on how the transaction fees are being entered within QuickBooks. Last, by entering them automatically using a third-party app you can provide near real time financial updates. This is especially true if the app being used to record the Shopify fees are updating Quickbooks daily.
The biggest drawback of automating payment fee entries is the subscription fee that the integration may require. The success of the integration also depends on how accurately you map it to categorize transactions correctly in QuickBooks.
Manually entering Shopify fees ensures that you capture all fees in your QuickBooks software. While it is cost-effective, it can take a lot of time, and carries a higher risk of mistakes.
Choosing whether to enter Shopify fees automatically or manually depends on your comfort level with accounting software, the size and volume of your transactions, and also your budget.
How to Record Shopify Fees in Quickbooks Manually

If you are not comfortable using an app to record Shopify fees in Quickbooks, you can record it manually. The following will show you exactly how to record Shopify fees in Quickbooks online.
How to Record Shopify Subscription Billing Fees in Quickbooks
Step 1: Download the source documents you need for each entry. If you need to enter subscription fees, then down the billing report from Shopify
Step 2: Log into Quickbooks and create an expense. After you log into Quickbooks, click the “Create” button from the side panel and click “expense”.
Step 4: Fill in the expense form. Using the billing report you downloaded, complete the date, supplier, category, taxes (if applicable), and amounts paid. Attach a copy of the source document.
Step 5: Save and close, then repeat for a different expense.
How to Record Shopify Payment Processing Fees in Quickbooks
Step 1: Download the source documents you need for each entry. For example, if you need to enter the payment processing fees, then download the payout report
Step 3: Log into Quickbooks and create an expense. After you log into Quickbooks, click the “Create” button from the side panel and click “expense”. Repeat for each expense category.
Step 4: Fill in the expense form. Complete the date, supplier, category, taxes (if applicable), and amounts paid. Attach a copy of the source document. The fee amount will be the sum of fees under the column fees in the report you downloaded.
Step 5: Save and close, then repeat for a different cycle.
When Should I Record Shopify Fees Manually
You should record shopify fees manually in the following situations:
- When you are not comfortable using a app.
- If you have basic bookkeeping knowledge of how to record things in Quickbooks.
- Transaction volume is low and you have keep up with recording things manually
Otherwise, it is best to use a bookkeeping service or an app to automate the process.
Entering Shopify Fees Automatically
For those who want to enter Shopify fees automatically, you can do so using Quickbooks connect or thirdparty apps from the Quickbooks store.
Popular Integration Tools
As your store grows on Shopify, manually recording every fee can quickly become inefficient. This is where integration tools come in. Apps like A2X, Zapier, and QuickBooks Online integrations can automatically sync your sales data, payouts, and fees. These tools are designed to categorize transactions correctly and push them into your accounting system with minimal effort. Many also allow you to map Shopify fee types to specific accounts, ensuring consistent and accurate bookkeeping.
Benefits of Automation for Scaling Businesses
Automation becomes especially valuable as order volume increases. It reduces the risk of human error, saves hours of manual data entry, and keeps your financial records up to date in near real time. With accurate, automated tracking, you can generate reliable reports and gain better insights into how fees impact profitability. This allows you to focus more on growing your business rather than managing spreadsheets or reconciling transactions manually.
Common Errors and How to Avoid Them
When you enter Shopify fees into Quickbooks, you might make some mistakes. Below are some common ones.
Double-Counting Fees
One of the most common mistakes when recording fees from Shopify in QuickBooks is double-counting. This usually happens when business owners record the net payout as income and then also record individual sales separately, effectively inflating revenue. It can also occur if fees are entered more than once – both through bank feeds and manual entries. To avoid this, always start with gross sales and subtract fees once, ensuring each transaction is only recorded in one place.
Misclassifying Expenses
Another frequent issue is placing all fees into a generic expense account or categorizing them incorrectly. For example, mixing subscription fees with transaction fees can make it harder to analyze costs. Instead, assign each fee type to its own account for clearer reporting. Proper classification helps you understand where your money is going and improves the accuracy of your financial statements.
Conclusion to Recording Shopify Fees
Recording fees from Shopify correctly in QuickBooks is essential for understanding your true profitability. By separating gross sales from fees, categorizing expenses properly, and reconciling payouts accurately, you create clean and reliable financial records. Whether you choose manual entry or automation, consistency is key to avoiding errors and maintaining clarity in your books.
When to Consider Hiring a Professional
As your business grows, managing accounting on your own can become more complex and time-consuming. If you find yourself struggling with reconciliation, reporting, or tax preparation, it may be worth working with a bookkeeper or accountant. A professional can ensure your Shopify fees are recorded correctly, help you stay compliant, and free up your time to focus on scaling your business.