Doing your bookkeeping accurately is one of the best things you can do for your business. However, some bookkeeping scenarios are not as straightforward as they seem and can sometimes be confusing. One of these cases is how to handle bills that have already been paid before they are recorded in QBO. Regardless of how these bills were paid, it is important to know how to record them into Quickbooks Online to keep accurate finances.
Why does this matter?
Properly documenting these payments ensures your expense tracking, accounts payable, and cash flow statements reflect reality. Errors or omissions can lead to imbalances, complicating reconciliation and potentially causing issues during tax season. For instance, recording a paid bill as unpaid might inflate your liabilities, while failing to account for the payment method could disrupt cash flow tracking.
When a bill has already been paid outside of the usual accounts payable workflow, you need to make sure this is properly reflected. Fortunately, QBO provides several options to tackle this issue, each suited to different situations.
This blog will walk you through four effective ways to record bills that have already been paid in QuickBooks Online:
- Recording the Bill and Marking it as Paid: This method is ideal if you want to maintain a record of the original bill while ensuring it doesn’t appear as unpaid.
- Entering the Expense Directly: When creating a bill isn’t necessary, entering the payment directly as an expense can save time while keeping your records accurate.
- Using Journal Entries: If you’ve paid a bill using personal funds, this approach allows you to track the expense while maintaining a clear distinction between personal and business finances.
- Recording it from the Bank Feed: Bills paid with credit card or chequing accounts can easily be entered using the connected bank feeds.
Each method has its advantages and is best suited to specific scenarios and will be discussed in this blog.
In the following sections, we’ll dive into the details of each method, providing step-by-step instructions to help you implement them in QuickBooks Online. Whether you’re a small business owner managing your own books or a professional bookkeeper working on behalf of clients, mastering these techniques will simplify your workflows and ensure your financial records remain precise and reliable.
Ready to streamline your bookkeeping? Let’s explore the four ways to record paid bills in QuickBooks Online.
Enter Bill Already Paid as an Expense
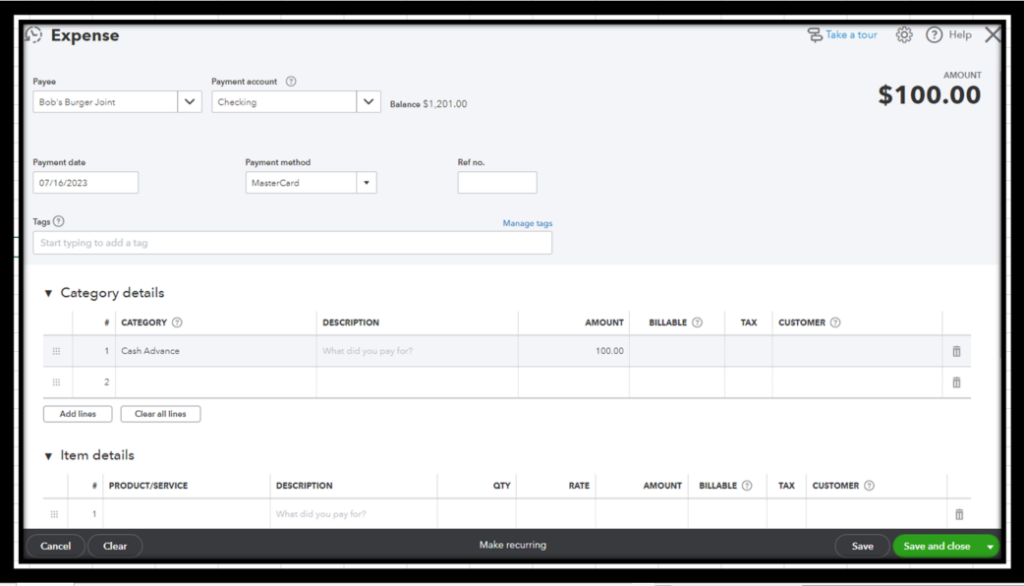
If a bill has already been paid, it may not necessary to create a bill for it in QuickBooks Online. In such recording the bill as an expense the most efficient option to deal with this situation. This method bypasses the accounts payable workflow and decreases any liabilities that may be created with a bill. It also ensures your profit/loss statement is current.
Recording a paid bill as an expense is particularly useful for small, one-time transactions or when the payment is made directly from a business bank account, credit card, or petty cash. It’s also an excellent choice when you don’t need to monitor the bill’s status or its impact on accounts payable. By following this approach, you can save time while still maintaining the precision required for effective bookkeeping.
Here is how to record a bill already paid, as an expense:
- Navigate to + New > Expense.
- Fill in the payment method, account, and vendor.
- Add relevant details such as the amount, date, and description.
- Click Save
Using a Journal Entry to Enter Bills Already Paid in QBO
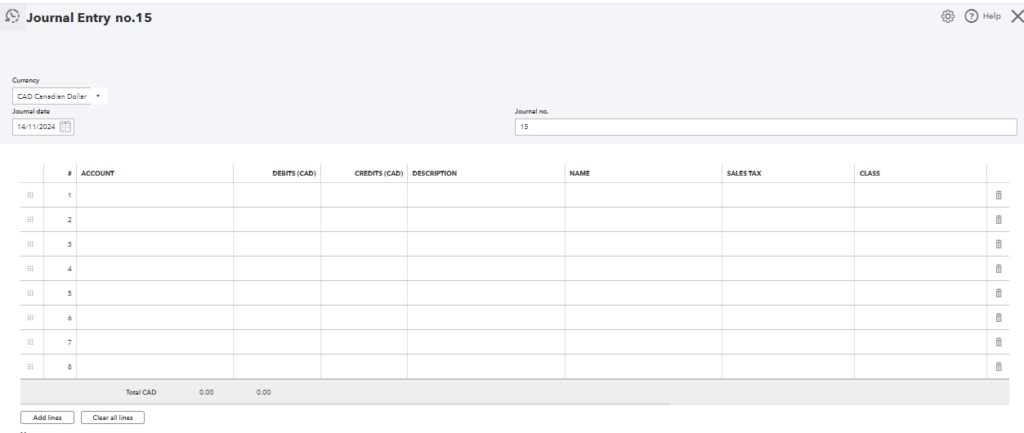
Another method to enter bills already paid in Quickbooks Online, is to use journal entries. Journal entries are not your typical method to handle this case but they can be useful. Journal entries can be used to enter bills already paid in Quickbooks Online when the bill is paid personally.
Quickbooks online does not allow users to properly marks bills as paid if they were are paid personally Therefore, using a journal entry is the best way around this. A journal entry allows you to freely enter the accounts that were affected by the bill payment.
Another reason to use a journal entry to enter bills already paid in QBO is if you have a lot of paid bills to enter. In such a case, it may be more advantageous to use a journal entry because you can quickly enter the suppliers, payment account and categories for those paid bills without having to create a new bill or expense each time.
Here is how to record a bill already paid, as a journal entry:
- Go to + New > Journal Entry.
- Debit the expense account associated with the bill.
- Credit the account the bill was paid with.
Enter the Bill, then Add a Payment
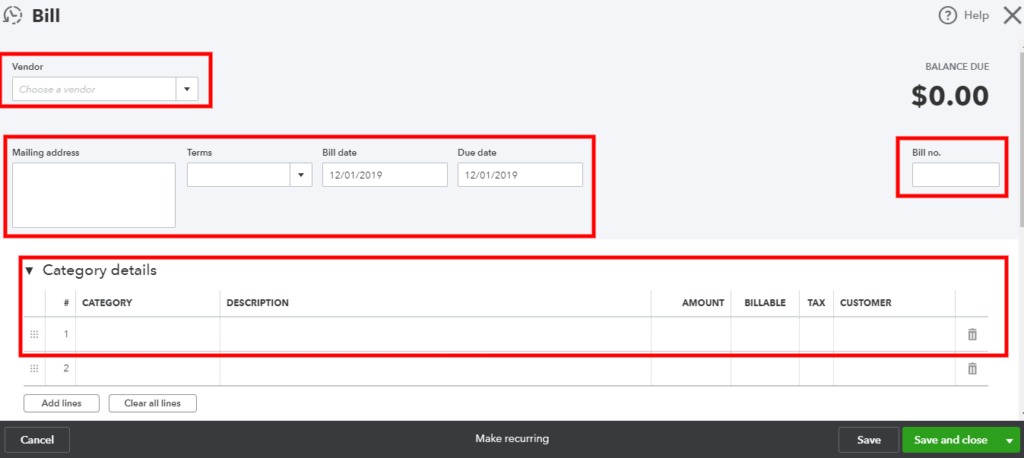
The most accurate way to enter a bill that has already been paid it to first create a bill, then add a payment to it in Quickbooks. This method ensure you follow the correct accounts payable workflow and accurately track vendor bills in Quickbooks.
This method requires 2 steps: 1) recording the bill 2) add a payment to the bill. Doing this ensures ensures that your accounts payable, expense tracking, and cash flow reports remain accurate without showing unpaid bills that don’t exist. It also provides a clear audit trail, linking the bill to its payment for easy reference during reconciliations or audits.
Here is how to enter a bill then add a payment to it:
Enter a bill:
- Click + New in the upper left corner
- Under Vendors click Bill
- Fill in the following:
- Vendor, Bill date, Due date, if applicable, Category, Description, optional, Amount
- Attach a copy of the receipt, optional
- Click Save and Close
Mark Bill as Paid:
- Click + New in the upper left corner
- Under Vendors click Pay bills
- Choose the bill you want to pay
- Fill in the following:
- Payment account (account the bill was actually paid from)
- Payment date
- Check off all bills paid with this payment
- Adjust Payment amounts if needed
- Click Save and Close
Using the Bank Feed
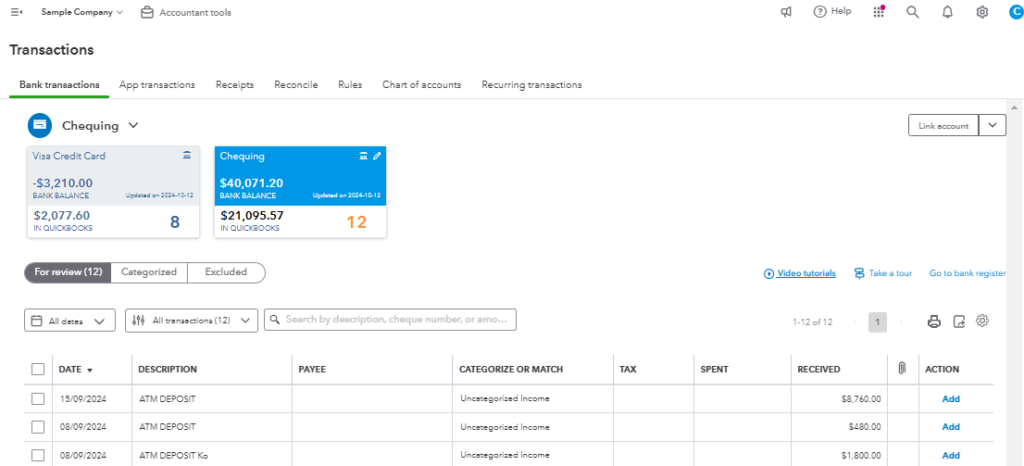
Finally, you can use your connected bank feed to enter bills already paid in QBO. This is only useful if the bill was paid using one of the bank accounts connected to the bank feed. The bank feed will show all the transactions that flow into your connected bank and therefore will show the bill that was paid. All that will be left is it properly categorize the bill that was paid.
This method is particularly useful for businesses with high transaction volumes or those that rely heavily on online banking. Instead of manually entering payments, the bank feed allows you to import and categorize transactions directly from your connected accounts. This streamlines the process of recording bills already paid and ensures all payments are correctly documented in your books.
Here is how to enter bills already paid in Quickbooks using the bank feed:
- Go to Transactions > Bank Transaction.
- From the bank feed, click on the transaction that represents your bill payment.
- Use the category option and enter the name, category, and tax (if applicable) of the paid bill.
- Alternatively, if the bill is already in QBO, you can use the match option, to match the payment to the bill
Your Call to Action
Whether it’s entering paid bills, reconciling accounts, or setting up workflows to save time, we’re here to make your bookkeeping stress-free. Contact us today for a consultation and discover how our expert services can keep your books in perfect order, so you can focus on growing your business.
Conclusion to Enter Bills Already Paid in Quickbooks Online
By using of these 4 ways to enter bills already paid in QBO, you can ensure accurate financials, always. The key is selecting the right approach based on your business needs and payment methods.
By following these strategies, you can streamline your bookkeeping process, avoid common mistakes, and ensure that your accounts reflect the true financial position of your business. If you’re looking to simplify your bookkeeping even further or need assistance managing your QuickBooks Online account, don’t hesitate to reach out to a professional. Staying on top of your finances has never been easier, and with the right tools and practices, you can maintain accurate records with ease.

